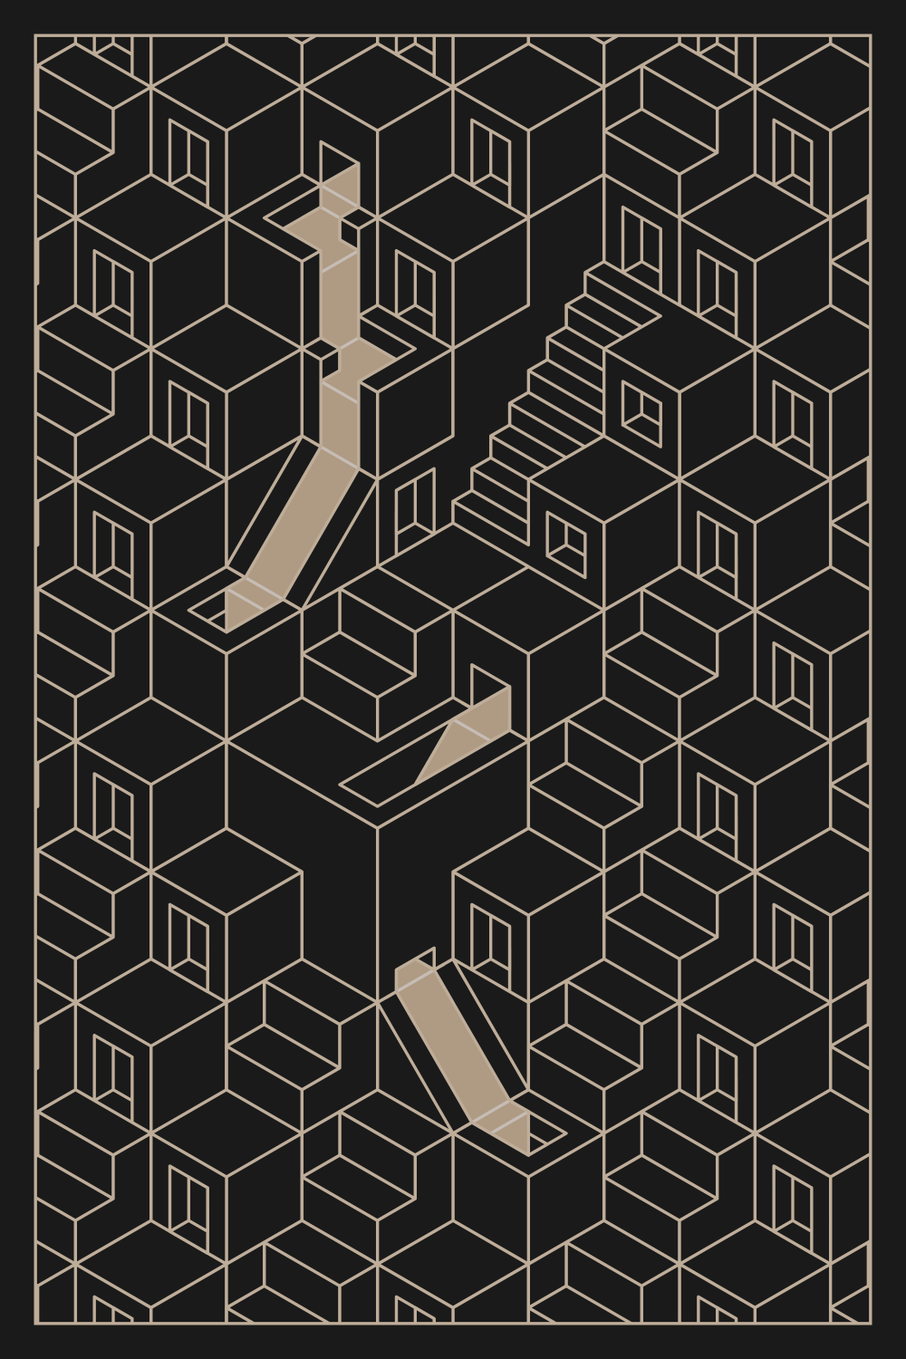
Isometric Cubes
Acequia is a collection of isometric art, from a technical perspective (pun intended) this means that height, width, and depth all use the same scale. Isometric views are often used in technical drawings, but they are also a wonderful method for creating strong geometric compositions.
The fundamental building block of Acequia is the humble cube so that's where we'll start. Thankfully, drawing a cube in an isometric view is quite simple (feel free to try this out):
- Pick a point and draw two lines of equal length L at 30 degrees from the horizontal.
- Draw three lines, also of length L, vertically up from the initial point and the end of the two lines from step 1.
- Connect the end of the middle vertical line to the end of the outer vertical lines.
- Locate the point a distance L vertically above the end of the middle vertical line.
- Connect this point to the end of the outer vertical lines.
Reading that back, it doesn't actually sound so simple, but a picture is worth a thousand words!
From Cubes to Hexagons
Through the magic of mathematics, the outline of an isometric cube also happens to be a regular hexagon (a six-sided shape with sides are of equal length).
Hexagons are ideally suited for creating art because they tesselate, which is a fancy way of saying they can fit together in a repeating pattern with no gaps.
Returning to our simple cube, we can add some color to each face to begin creating a sense of depth. Even with just 3 cubes, the underlying hexagonal grid is no longer apparent. Instead, we have a perfectly formed stack of cubes in its place.
Coordinates Part I - The Grid
We've had a couple of easy wins so far, but our luck begins to run out a bit at this stage.
In a square grid we can use the traditional x/y coordinate system to refer to any square without ambiguity. Hexagonal grids are a bit trickier, there are several possible layouts depending on the orientation of the hexagons and how odd rows or columns are treated.
For Acequia, the "even-r" horizontal layout is ideal since we need the point of a hexagon at the top in order to create our cube stacks and I prefer even numbers (I don't know why!).
During the design and development process, there were times when it was convenient to reference the "index" of a hex (the number that represents its order starting from the top left) and other times when the "x/y" approach worked best. For this reason, I created helper functions that allowed me to switch between these as needed.
const hexNoToPosn = (n) => {
  return { x: n % (gridX + 1), y: floor(n / (gridX + 1)) };
};

const hexPosnToNo = (posn) => {
  if (posn.x > gridX || posn.y > gridY) return -1;
  return posn.x + posn.y * (gridX + 1);
};
A full deep-dive into hexagonal grids is well beyond the scope of this article (and my understanding) but if you would like to learn more then I strongly recommend this guide which was a huge help to me - https://www.redblobgames.com/grids/hexagons/
Coordinates Part II - The Hex
In order to draw our isometric cubes we need to be able to easily locate and reference the points of our hexagon. This becomes even more important when we move beyond simple cubes into slopes, holes, carve-outs, etc.
Unlike a simple square grid, we have several different distances to account for when calculating the equivalent x/y coordinate that is required in order to draw our lines in p5js.
In order to simplify this, I took the approach of using the centre of the hexagon as a "home" point. Each time a cube was drawn, the first step is to move (using the p5js translate function) to this central point.
Keeping track of the corners of the hex and moving between them quickly became quite overwhelming. Initially I numbered the corners from 1-6, but using more numbers added more confusion and gave me a headache. So I opted to switch to a variant on a traditional compass system, starting at our central point I could refer to the points as N/NE/SE/S/SE/NW (clockwise from the top).
With this system in place, prior to drawing anything, the position of the centre for each hex is calculated and vectors created to represent the movement from the centre to each corner. In this way, I could locate any point within the bounds of each hex using a combination of the hex's centre and the sum of one or more partial/whole vectors.
Coordinates Part III - Scaling
In order to simplify the process of drawing at multiple scales, I created some simple helper functions to replace several standard p5js functions. These functions meant I only needed to set a scaling value once at the beginning of my code, I could then simply use the helper functions in place of the regular functions.
// Helper function
const scaledVertex = (x1, y1) => {
  vertex(x1 * scaling, y1 * scaling);
};

// Using Helper Function and Compass System
beginShape();
scaledVertex(NE.x, NE.y);
scaledVertex(SE.x, SE.y);
scaledVertex(S.x, S.y);
scaledVertex(S.x, S.y - 0.5);
scaledVertex(S.x + 0.5 * NNE.x, S.y + 0.5 * NNE.y);
scaledVertex(NE.x, NE.y);
endShape();
Clusters
In addition to individual cubes, most (but not all) Acequia pieces have "clusters". These are larger elements that allowed Rick and I to explore designs that weren't possible with a single cube. Examples include towers, semi-hidden stairs, various dwellings, and water pools (more on those later).
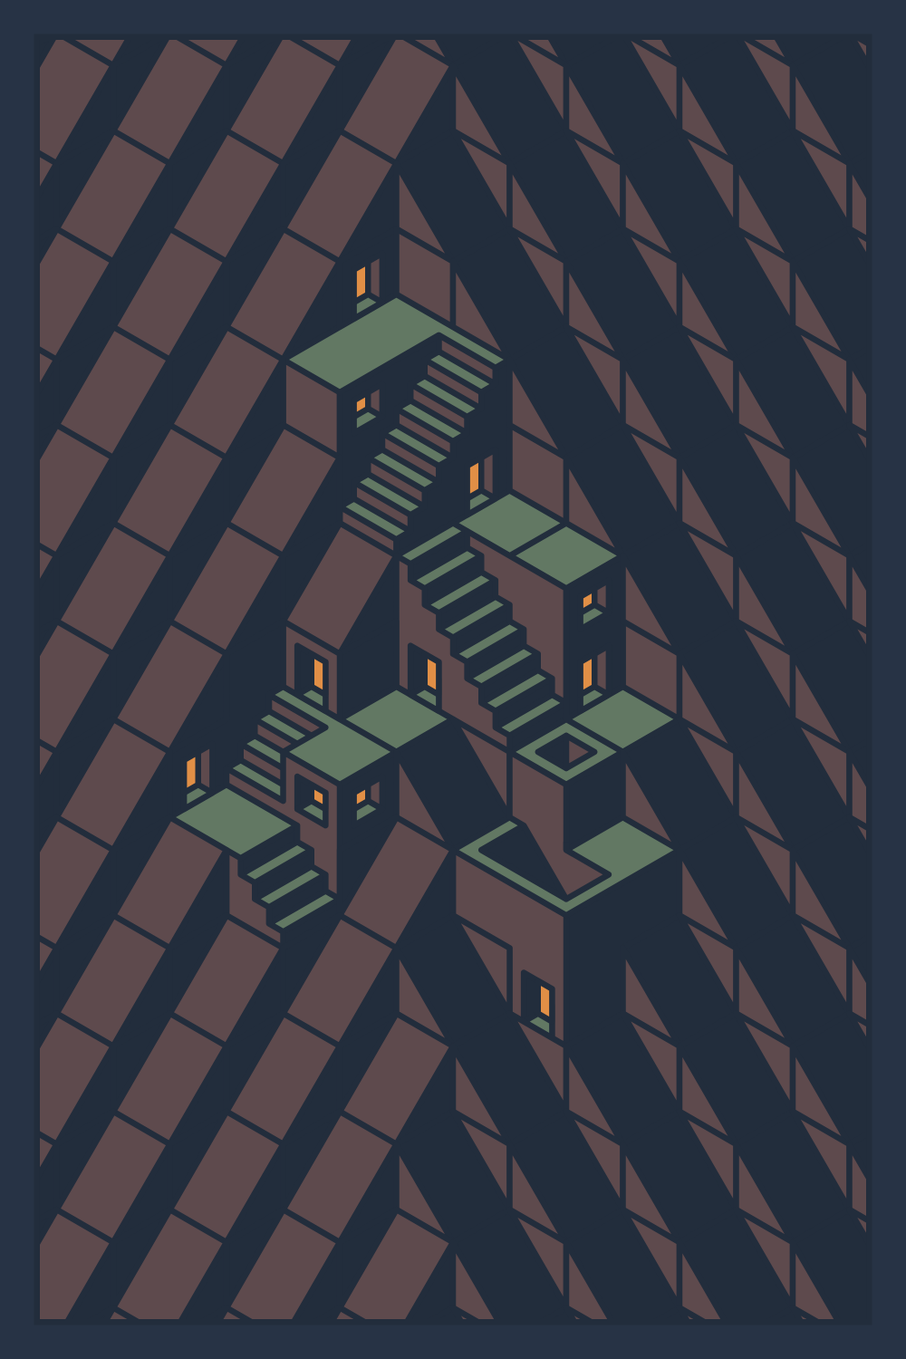
Each cluster takes the space of two or more single cubes. In order to ensure we don't draw in the same place twice, we need to keep track of the space that each cluster will use. To facilitate this, each cluster has a "root" hex and then one or more other hexes which it will need to reserve to prevent them being used by single cubes (or other clusters).
The code below shows a simplified version of how this was tracked for a single cluster, "id" allows us to identify this particular cluster type, "fn" points to the code for drawing the cluster, and "hexes" is a list of the relative coordinates of each hex (including the root hex).
const cluster = {
  id: "C1",
  fn: drawC1,
  hexes: [
    { x: 0, y: 0 },
    { x: 0, y: 1 },
    { x: 1, y: 1 },
    { x: 0, y: 2 },
    { x: -1, y: 2 },
  ]
};
Flipping Cubes
A major advantage of the compass-based approach was that creating mirrored versions of single hex designs is as simple as swapping the NE & SE and NW & SW vectors (and face colors). Mirroring clusters was slightly more complicated if the cluster was asymmetric, requiring the addition of a "flippedHexes" attribute in order to track the relative coordinates of the hexes in the mirrored state.
On a small side note, the compass system also allowed for the possibility of rotating hex designs by 120 or 240 degrees. This was something that Rick and I explored at length but ultimately decided not to include in the series, we'll talk more about this in a future article.
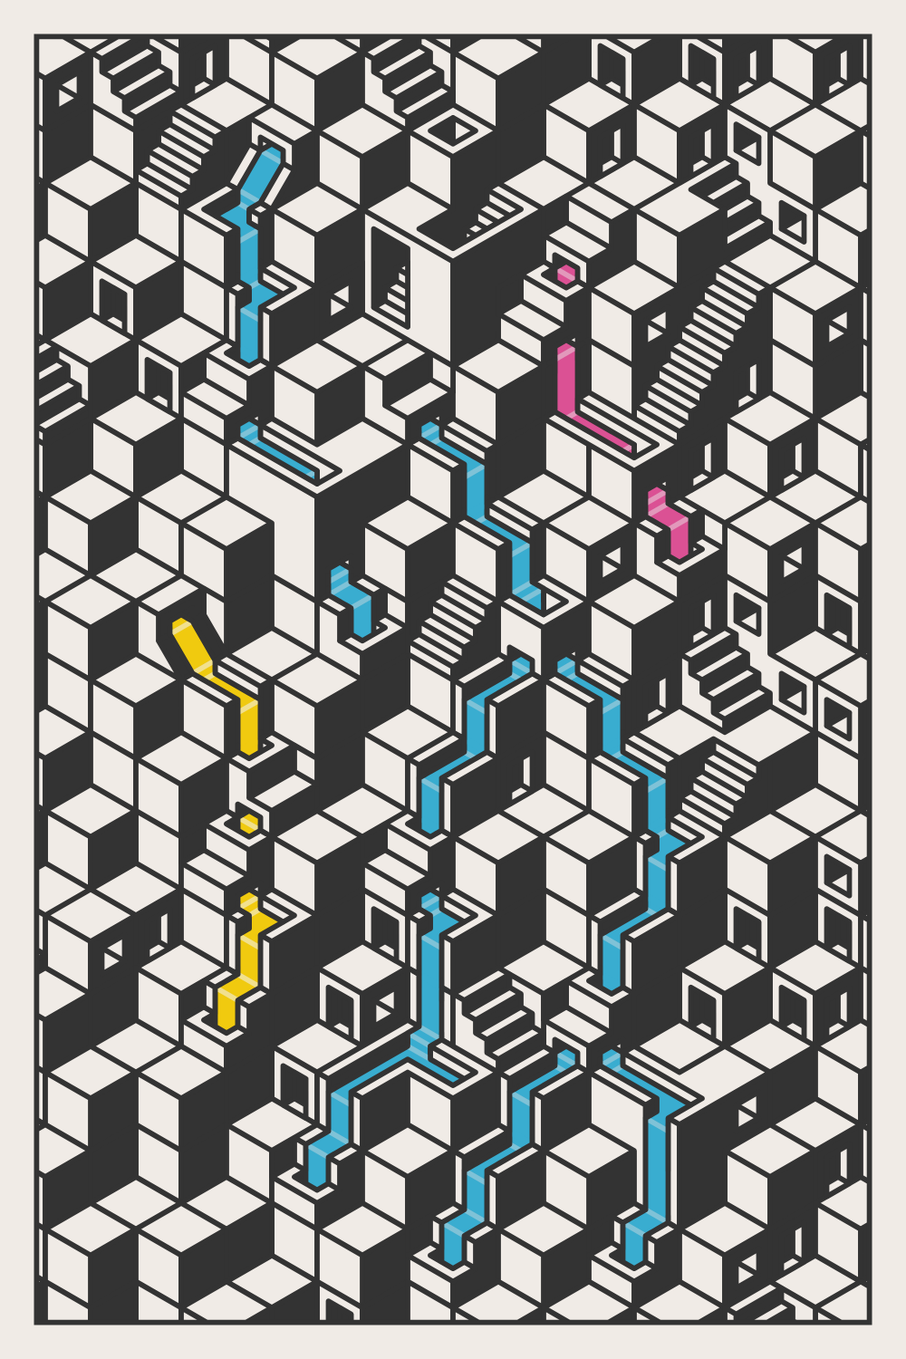
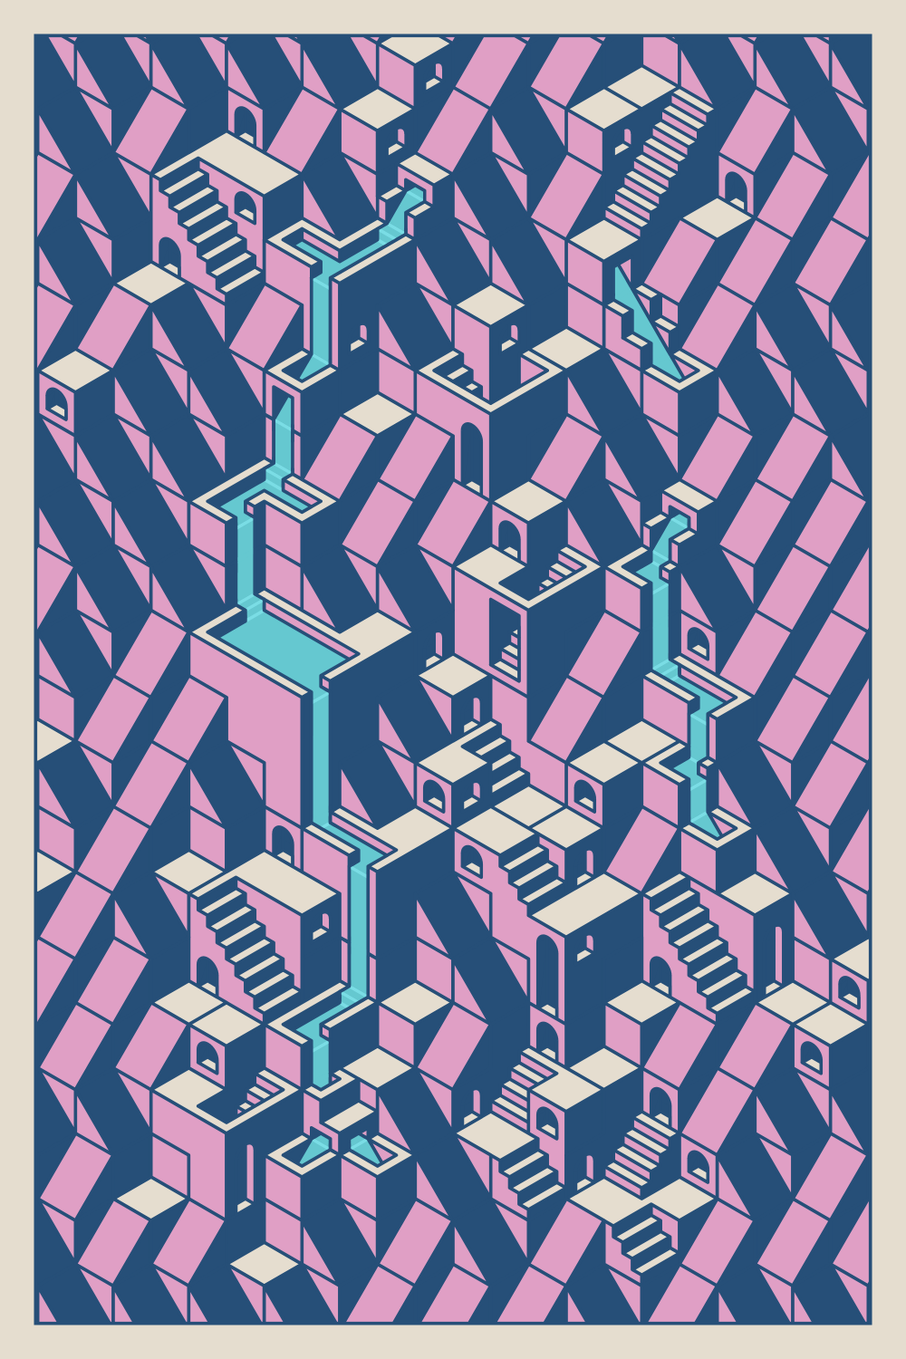
Water Part I - Pathing
Without question, water was the most challenging element of Acequia from a coding perspective. Initially, Rick and I were working from static designs, the idea of animating the water came quite early, but neither of us knew just how much work it would turn out to be.
Building water routes is the first step in building any Acequia output, it is done before any other cubes or clusters are added because water paths must be continuous from source to exit.
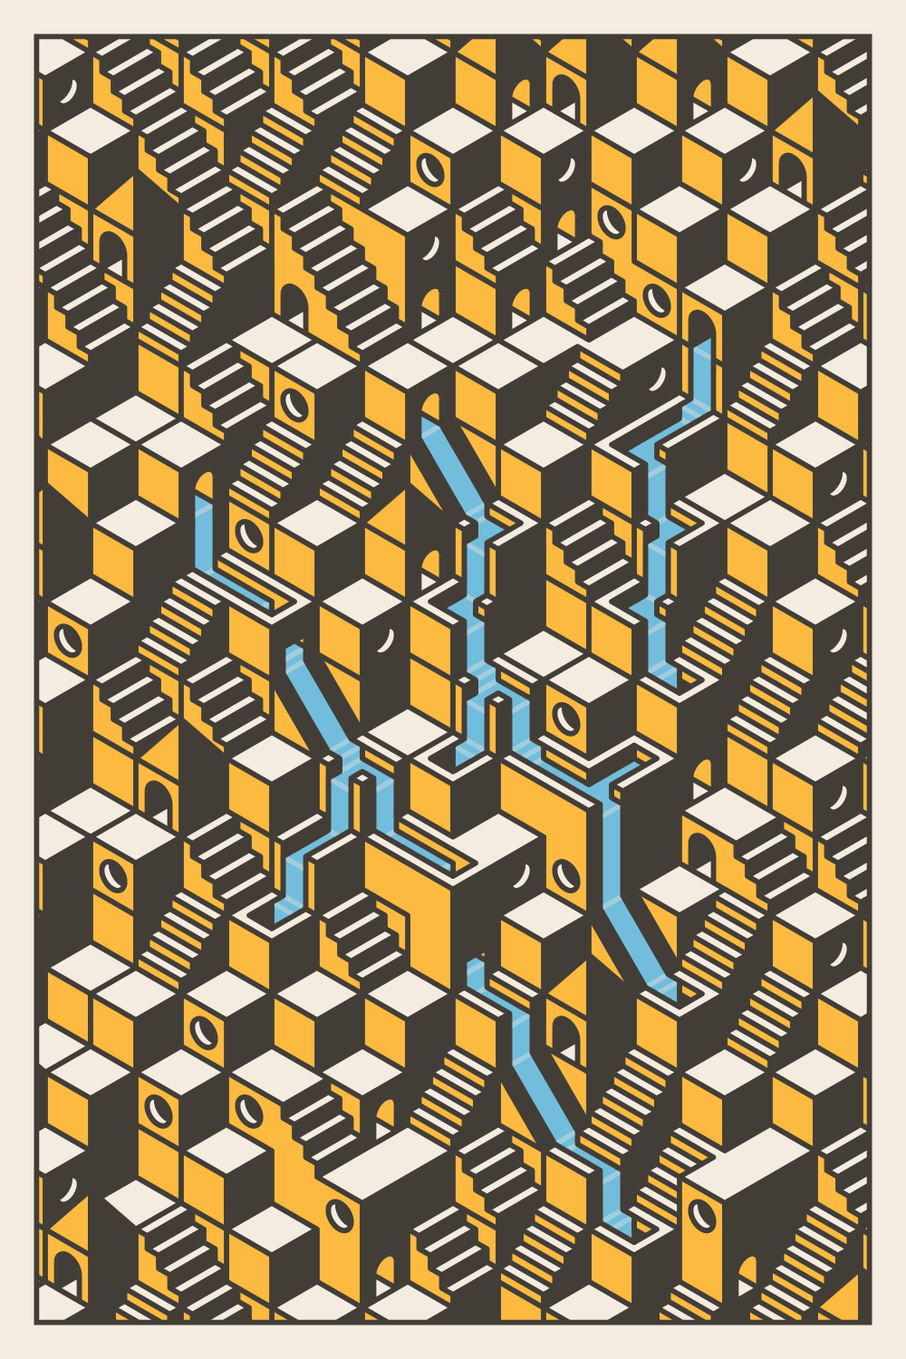
The first stage of adding water to each output is to determine where the water will flow. This is done according to the following fixed rules:
- Water flows must start in the upper half of the grid.
- Water cannot flow off the sides or bottom of the grid.
- Water paths cannot cross or merge.
- Water paths must be at least 3 hexes long.
In addition to these fixed rules, there are rules with varying hidden probabilities (these are not included in the traits for each output) that are checked each time a water route is extended.
- Water will have a 20-60% preference to flow straight rather than turn.
- Water will have a 10-30% chance to stop flowing (this is also weighted based on the grid scale).
- Water will have a 10-20% chance to split (up to a maximum no. of splits per output).
Once a valid water path has been found, each of the hexes that the water flows through is marked as a water hex so that fixed rule 3 can be enforced. This is repeated until the required number of water paths have been placed, which varies according to the climate and scale of each output.
Split water paths require some additional rules since they effectively behave as two independent paths after the split. Specifically, we have to ensure the split paths diverge and that we complete all split paths before starting a wholly new path. For the CMYK palette, the colors of the split paths also have to inherit the color of their shared parent.
Water Part II - Plumbing
Whilst water in Acequia appears to flow continuously, in reality each water hex (or cluster) is drawn independently. In order to achieve a smooth transition, various attributes need to be tracked for each cube that water flows through. The most important of these are shown in the simplified code below for a hypothetical water exit cube.
const waterHex = {
  id: "E1",
  fn: drawE1,
  waterGeneration: 0,
  waterLevel: 0,
  waterLevelMax: 100,
  waterLevelOut: 0,
  waterIn: ["NW"],
  waterInDirection: ["SE"],
  waterOutflow: 0,
  waterOut: [],
  waterOutDirection: [],
  waterActive: true,
}
There's a bit to unpack here, we've seen "id" and "fn" earlier and they have the same role here of identifying the cube type and pointing to the code to draw the cube. The other attributes are new so let's dive in (another dad joke, sorry!).
- waterGeneration - This is the amount of water that a hex self-generates, this is only non-zero for water sources.
- waterLevel - The current amount of water in the hex.
- waterLevelMax - This is the maximum amount of water that a hex can contain before it is full and waterLevel will no longer increase.
- waterLevelOut - This is the amount of water a hex needs to contain before water flows into the next hex in the water path (in the case of a water exit this is zero since water never flows out).
- waterIn - This is the direction/s of the hex from which water enters this hex.
- waterInDirection - This is the direction/s of the water flow when it enters the hex (more on this later)
- waterOutflow - This is the amount of water that leaves the hex once it has reached waterLevelOut (in the case of a water exit this is zero).
- waterOut - This is the direction/s of the hex to which this hex flows.
- waterOutDirection - This is the direction/s of the water flow as it leaves this hex (more on this later).
- waterActive - This is used to track whether this hex is "active", meaning it hasn't reached a steady state where it no longer needs to be redrawn each frame (more on this later).
When an Acequia piece starts, the only active water cubes will be the sources that generate their own water. Once they are full (waterLevel is equal to waterLevelOut) they increase the waterLevel of the target hex in the waterOut direction by an amount equal to waterOutflow. This process continues until each water path eventually terminates at a water exit cube.
Water Part III - Clusters
In a similar manner to dry cubes, there are also water clusters which include larger pools, drops, and other elements.
Each water cluster takes the place of two or more water cubes and usually some dry cubes as well. We track this in a similar manner to the dry clusters, but with some extra attributes to ensure we are replacing the correct types of water cube. This guarantees that the start and end of the replaced section of our water path are unchanged.
Water clusters also require a new "waterOutTarget" attribute, this is the relative coordinate from our root hex to the hex that water will flow into from this cluster. The complete list of attributes for our water cluster is shown in simplified form below:
const waterCluster = {
  id: "WC1",
  fn: drawWC1,
  hexes: [
    { x: 0, y: 0, type: "straight", flip: true },
    { x: 0, y: 1, type: "turn", flip: true },
    { x: 1, y: 1, type: "empty" },
    { x: 0, y: 2, type: "straight", flip: false },
  ],
  waterLevelMax: 900,
  waterLevelOut: 900,
  waterOutflow: 1,
  waterIn: ["NE"],
  waterInDirection: ["S"],
  waterOutTarget: { x: 1, y: 3 },
  waterOutDirection: ["S"],
  waterActive: true,
},
After our initial water paths have been placed, we scan each path looking for sets of water hexes that could be swapped out for a water cluster. A random selection of these clusters are then chosen and swapped out for the single cubes.
Water Part IV - Drawing
With our plumbing system in place, water is now moving invisibly from source to exit, the final step is to draw this visual progression.
In order to give a consistent pleasing feel to the water flows, we adopted some physics-defying rules:
- Water will fall vertically at twice the speed it flows horizontally.
- Water will not accelerate or decelerate (other than instantaneously per the previous rule).
- Water will turn as if anchored to the apex of the corner around which it is flowing.
- Water will not spread sideways when flowing down/across flat surfaces.
With these rules established, the first step of drawing the animated water is to sketch out (in isometric form) how each cube or cluster will fill. In the case of simple channels this is straightforward, water enters and flows in a straight line from one edge to the other. For clusters, this was much more complex, especially as some of the water behavior would often be partially or fully hidden.
For most of the cubes/clusters, I broke down the water animation into stages. Considering Acequia #9 below, specifically the water turn at the top of the output, these stages might look like this:
- Water drops down the rear vertical face
- Water flows horizontally until the near side reaches the apex of the corner.
- Water turns around the corner.
- Water flows horizontally until it reaches the top of the front vertical face.
- Water drops down the front vertical face.
There are some stages that are common across multiple cubes, such as dropping vertically into or out of a cube. Where possible, these stages were separated so they could be reused, I would be remiss if I didn't point out that this principle is sometimes referred to as DRY (don't repeat yourself).
With our compass system in place, we can use waterLevel to progressively draw the water flow. Since most cubes have multiple stages, it was often useful to use an intermediate "progress" variable to track the state for an individual stage. The following code snippet shows an example of how this can be used:
const progress = min(1, waterLevel / 50);

scaledQuad(
  0.25 * S.x + 0.5 * SW.x,
  0.25 * S.y + 0.5 * SW.y,
  0.25 * S.x,
  0.25 * S.y,
  (0.25 + 0.5 * progress) * S.x,
  (0.25 + 0.5 * progress) * S.y,
  (0.25 + 0.5 * progress) * S.x + 0.5 * SW.x,
  (0.25 + 0.5 * progress) * S.y + 0.5 * SW.y
);
Water Part V - Transitions & Highlights
I promised earlier that we'd come back to "waterInDirection" and "waterOutDirection". As a reminder, these indicate the direction that water is flowing when it enters and leaves a cube.
The reason we track this information is that when water changes from flowing vertically to horizontally (or vice-versa) we need to visually indicate this otherwise our water appears to just fall directly from top to bottom. To achieve this, when water flows from one cube to another, if the "waterOutDirection" of the first cube is different to the "waterInDirection" of the second, then we add a highlight to indicate the transition. If the directions match then we draw an "invisible" join in the same color as the water in order to hide the outline of the cubes.
The same highlight effect is also used for transitions inside a cube/cluster. This required careful consideration because these transitions can move and be transient, shifting and disappearing as water fills up a cube.
Water Part VI - Tidying up
As well as being quite fiddly, adding the highlights has an unfortunate side effect, the highlight line extends beyond the water flow, creating unsightly edges.
In order to remedy this, whenever a highlight is added we need to redraw the outlines for the overlapped sections of the cube/cluster. Furthermore, if the highlight is added instantaneously it can be slightly jarring. To alleviate that, I use a stroke modifier which builds up the strength of the highlight gradually.
The code below shows an example of adding the highlights and clean up lines for a simple hypothetical cube.
 // Highlights
  waterHighlights.push({
    strokeMod: 0.5 + progress / 2,
    vertices: [
      [0.25 * S.x, 0.25 * S.y],
      [0.5 * SE.x + 0.25 * S.x, 0.5 * SE.y + 0.25 * S.y],
    ],
  });

  // Edge clean up 1
  waterCleanup.push({
    vertices: [
      [0.25 * S.x - 0.125 * SW.x, 0.25 * S.y - 0.125 * SW.y],
      [0.25 * S.x, 0.25 * S.y],
      [(0.25 + 0.5 * progress) * S.x, (0.25 + 0.5 * progress) * S.y],
    ],
  });

  // Edge clean up 2
  waterCleanup.push({
    vertices: [
      [
        0.25 * S.x - 0.125 * SW.x + 0.5 * SE.x,
        0.25 * S.y - 0.125 * SW.y + 0.5 * SE.y,
      ],
      [0.25 * S.x + 0.5 * SE.x, 0.25 * S.y + 0.5 * SE.y],
      [
        (0.25 + 0.5 * progress) * S.x + 0.5 * SE.x,
        (0.25 + 0.5 * progress) * S.y + 0.5 * SE.y,
      ],
    ],
  });
That's all folks!
If you made it this far, then thanks for sticking around and for your interest in Acequia. Rick and I have been blown away by the enthusiasm and support, much love to you all!